

See plans · See how billing works
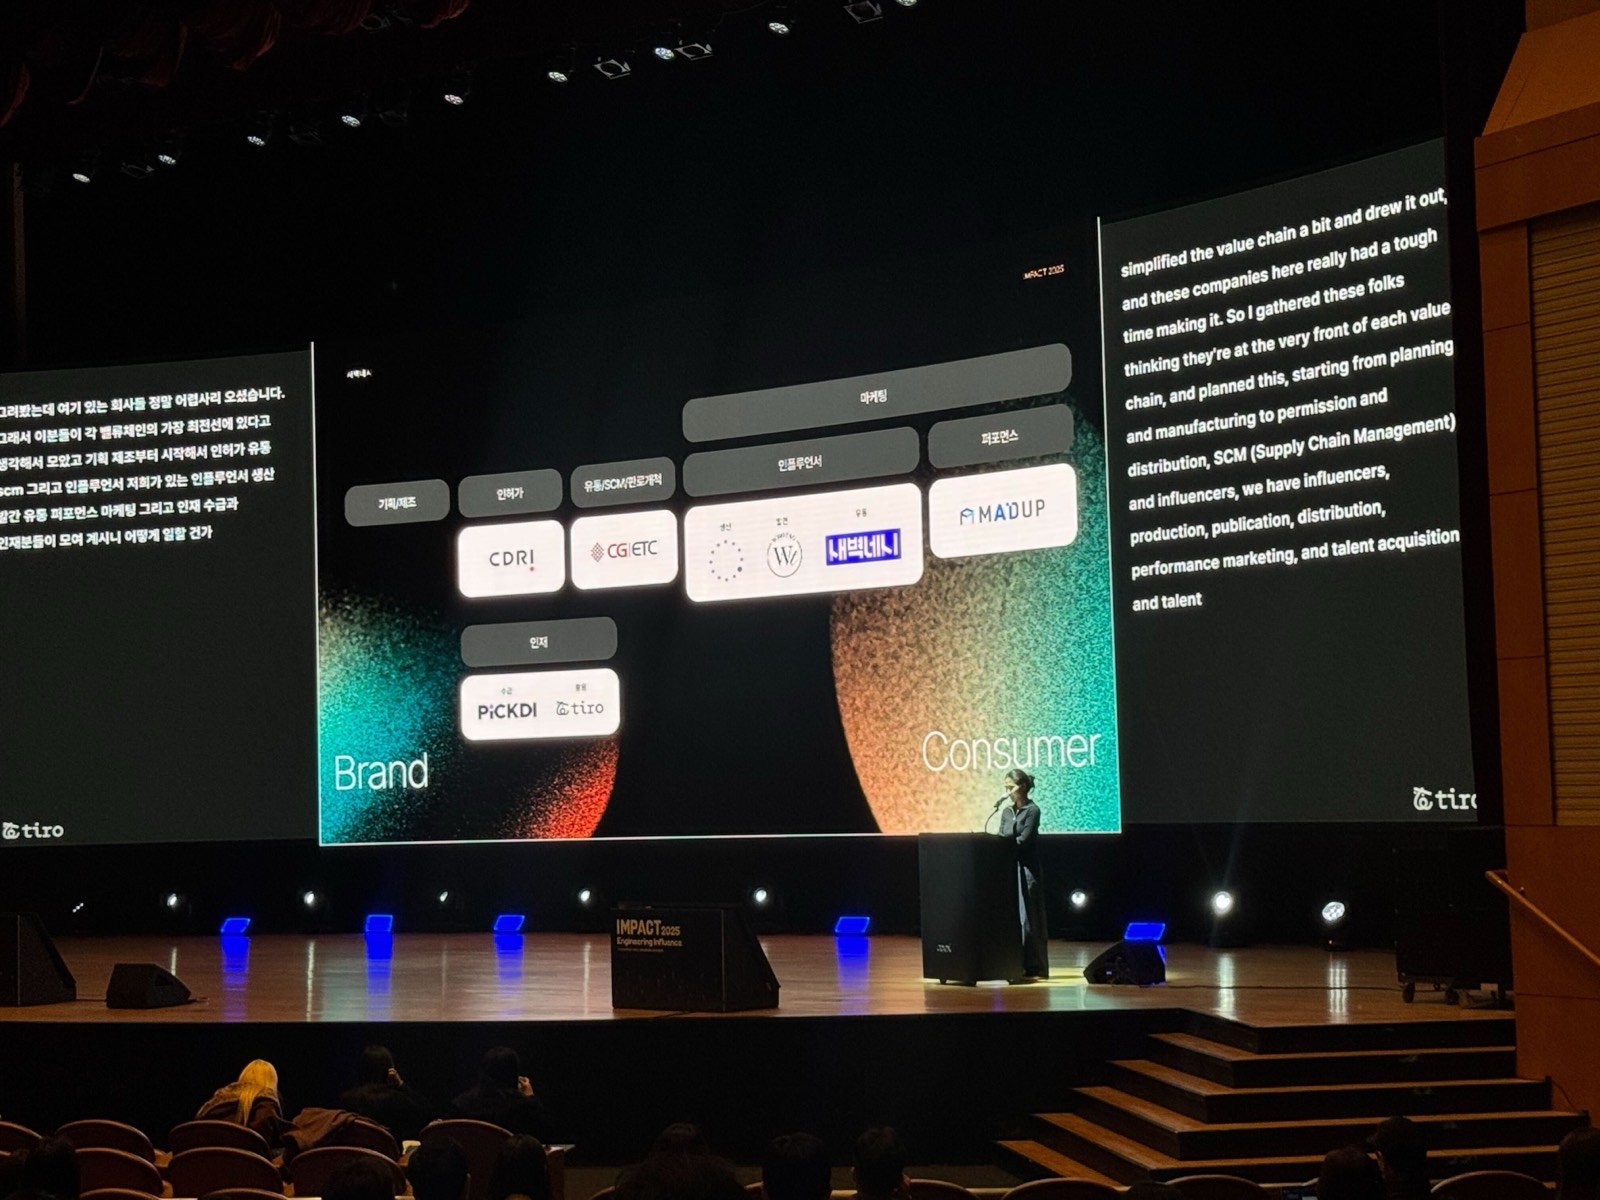
A venue screen split three ways: source captions on the left, the presentation slide in the middle, and translated captions on the right.
What you can do with Conference mode
- Show live captions in large type on the venue screen
- Let the audience scan a QR code and read captions on their own phones
- Display real-time translated captions for international attendees
- Hand off the recording afterward, when the link the audience watched becomes the full transcript page
Events it fits
Anywhere one person presents and a room listens.- International conferences and summits: show the source and the translation side by side when the speaker and the audience don’t share a language
- University lectures and symposiums: follow a foreign speaker’s talk with captions in your own language
- Demo days and investor briefings: the pitch stays on record and goes straight to attendees afterward
- Company town halls and all-hands: remote and international colleagues follow the same thing at the same time
- Talks, book events, and seminars: people in the back row read along on their own phones
Putting the display on screen
Turning it on
Start a multilingual live recording
Turn on Conference mode
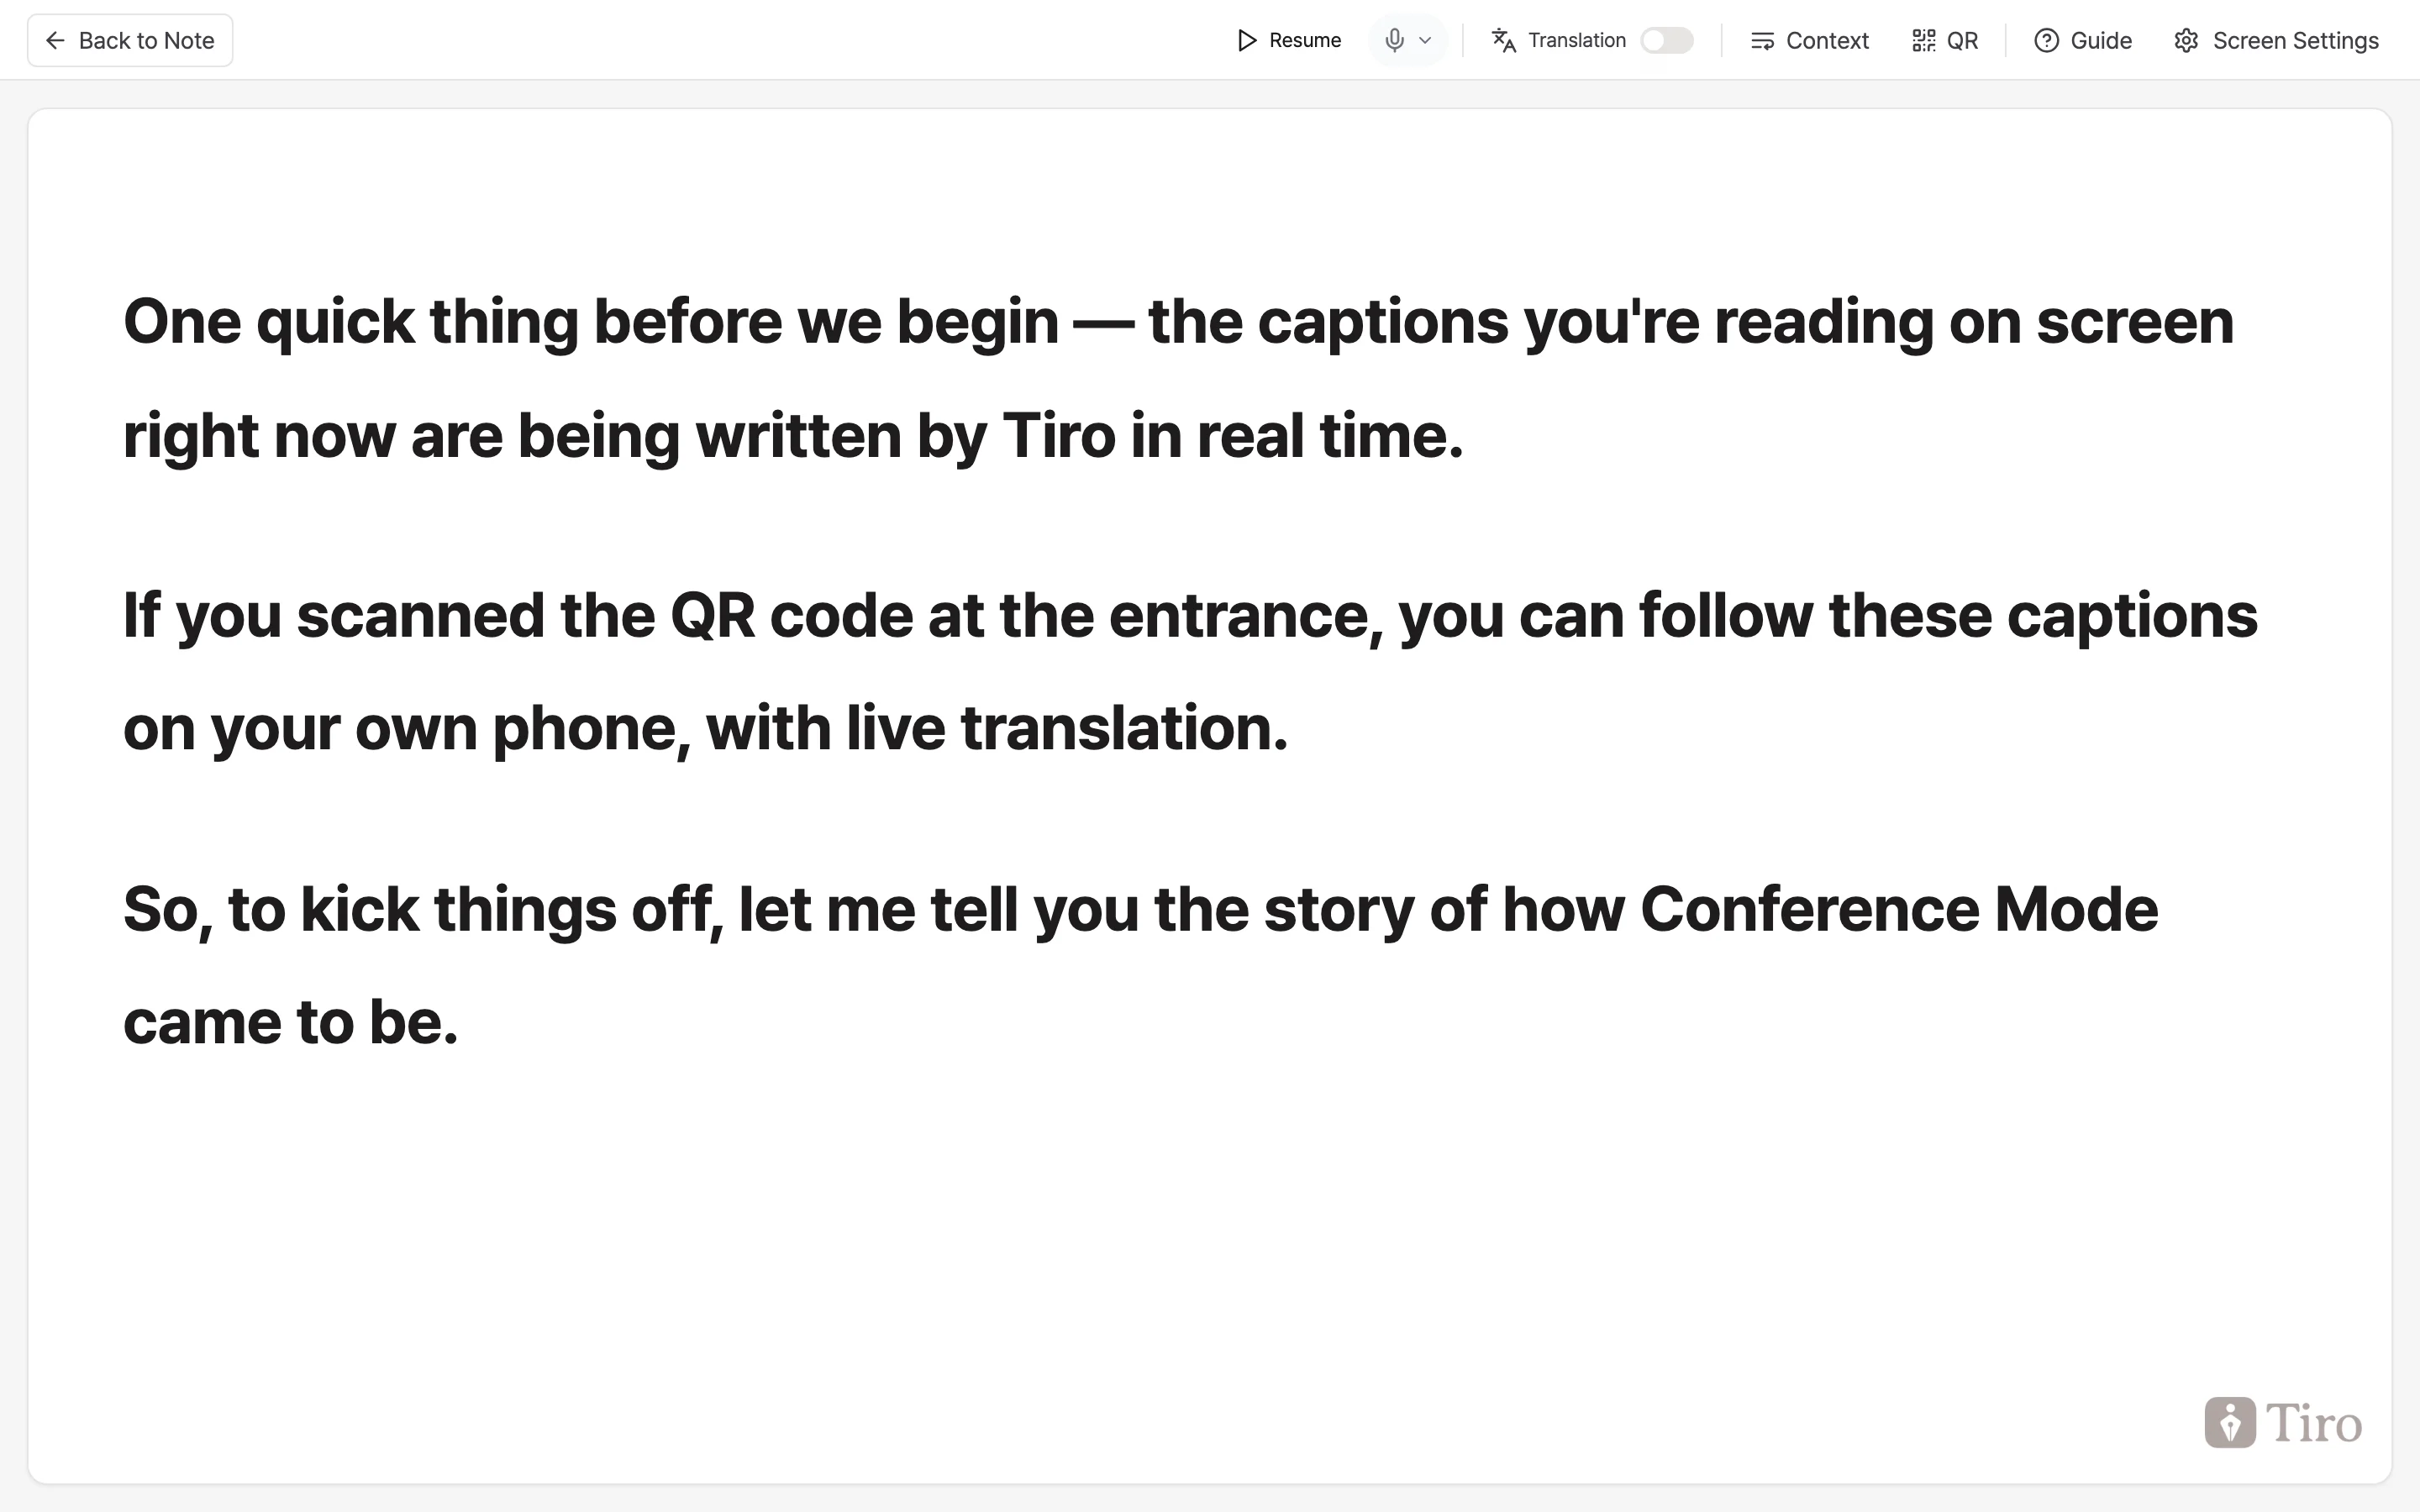
The Conference mode full-screen caption display. The top toolbar holds the [Translation], [Context], [QR], [Guide], and [Screen Settings] controls, and live captions appear in large type in the body.
Choosing a caption layout
[Display Mode] in the [Screen Settings] popover decides where the source and the translation sit. There are three shapes, each with a Mirrored version, plus a translation-only layout, for seven in total.- Horizontal · Horizontal Mirrored: source and translation side by side in two columns. Best for wide venue screens
- Vertical · Vertical Mirrored: source and translation stacked top and bottom. Best for tall displays or narrow screens
- Fixed · Fixed Mirrored: the source and translation each hold a fixed area of the screen, and captions update in place
- Translation Only: drops the source column and shows the translation in a single column across the full width of the screen, so the text runs larger too. A good fit for events where most of the audience doesn’t speak the presentation language
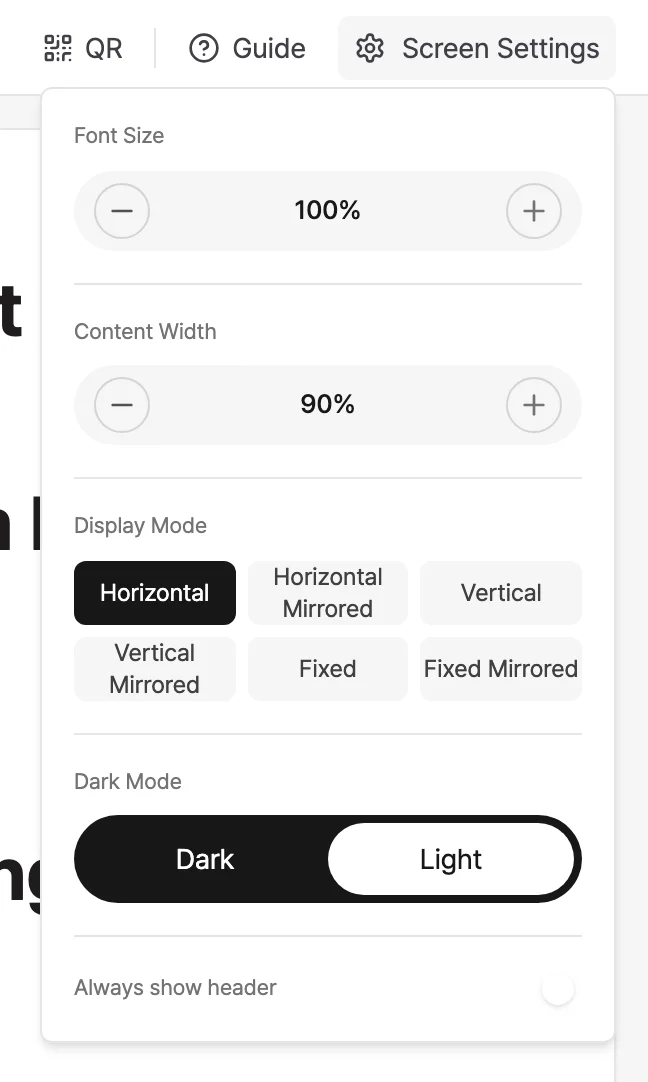
The top [Screen Settings] popover. Tune [Font Size], [Content Width], the [Display Mode] options, [Dark Mode], and [Always show header] to fit your venue.
Sizing the text for the room
The same popover fits the display to the size of the room and the lighting.- Font Size: 75% to 180%, in steps of 10%. Reading it yourself from the back row is the most reliable way to set this
- Content Width: 78% to 96%, in steps of 6%. Tightens or widens the side margins to match your screen ratio
- Dark Mode: choose a dark or light background. A dimmed venue is easier on the eyes with the dark background
- Always show header: decide whether the event info header stays pinned at the top of the screen
What you use during the talk
Share captions with the audience via QR
Tap the [QR] button at the top to show a QR code for the audience. They just scan it with their phone camera, and no sign-in is needed. Each attendee can adjust dark mode and font size on their own, and toggle translation on and off when the talk has translation enabled. Set a password on the link, and only people who enter the password shown on the talk screen can view it.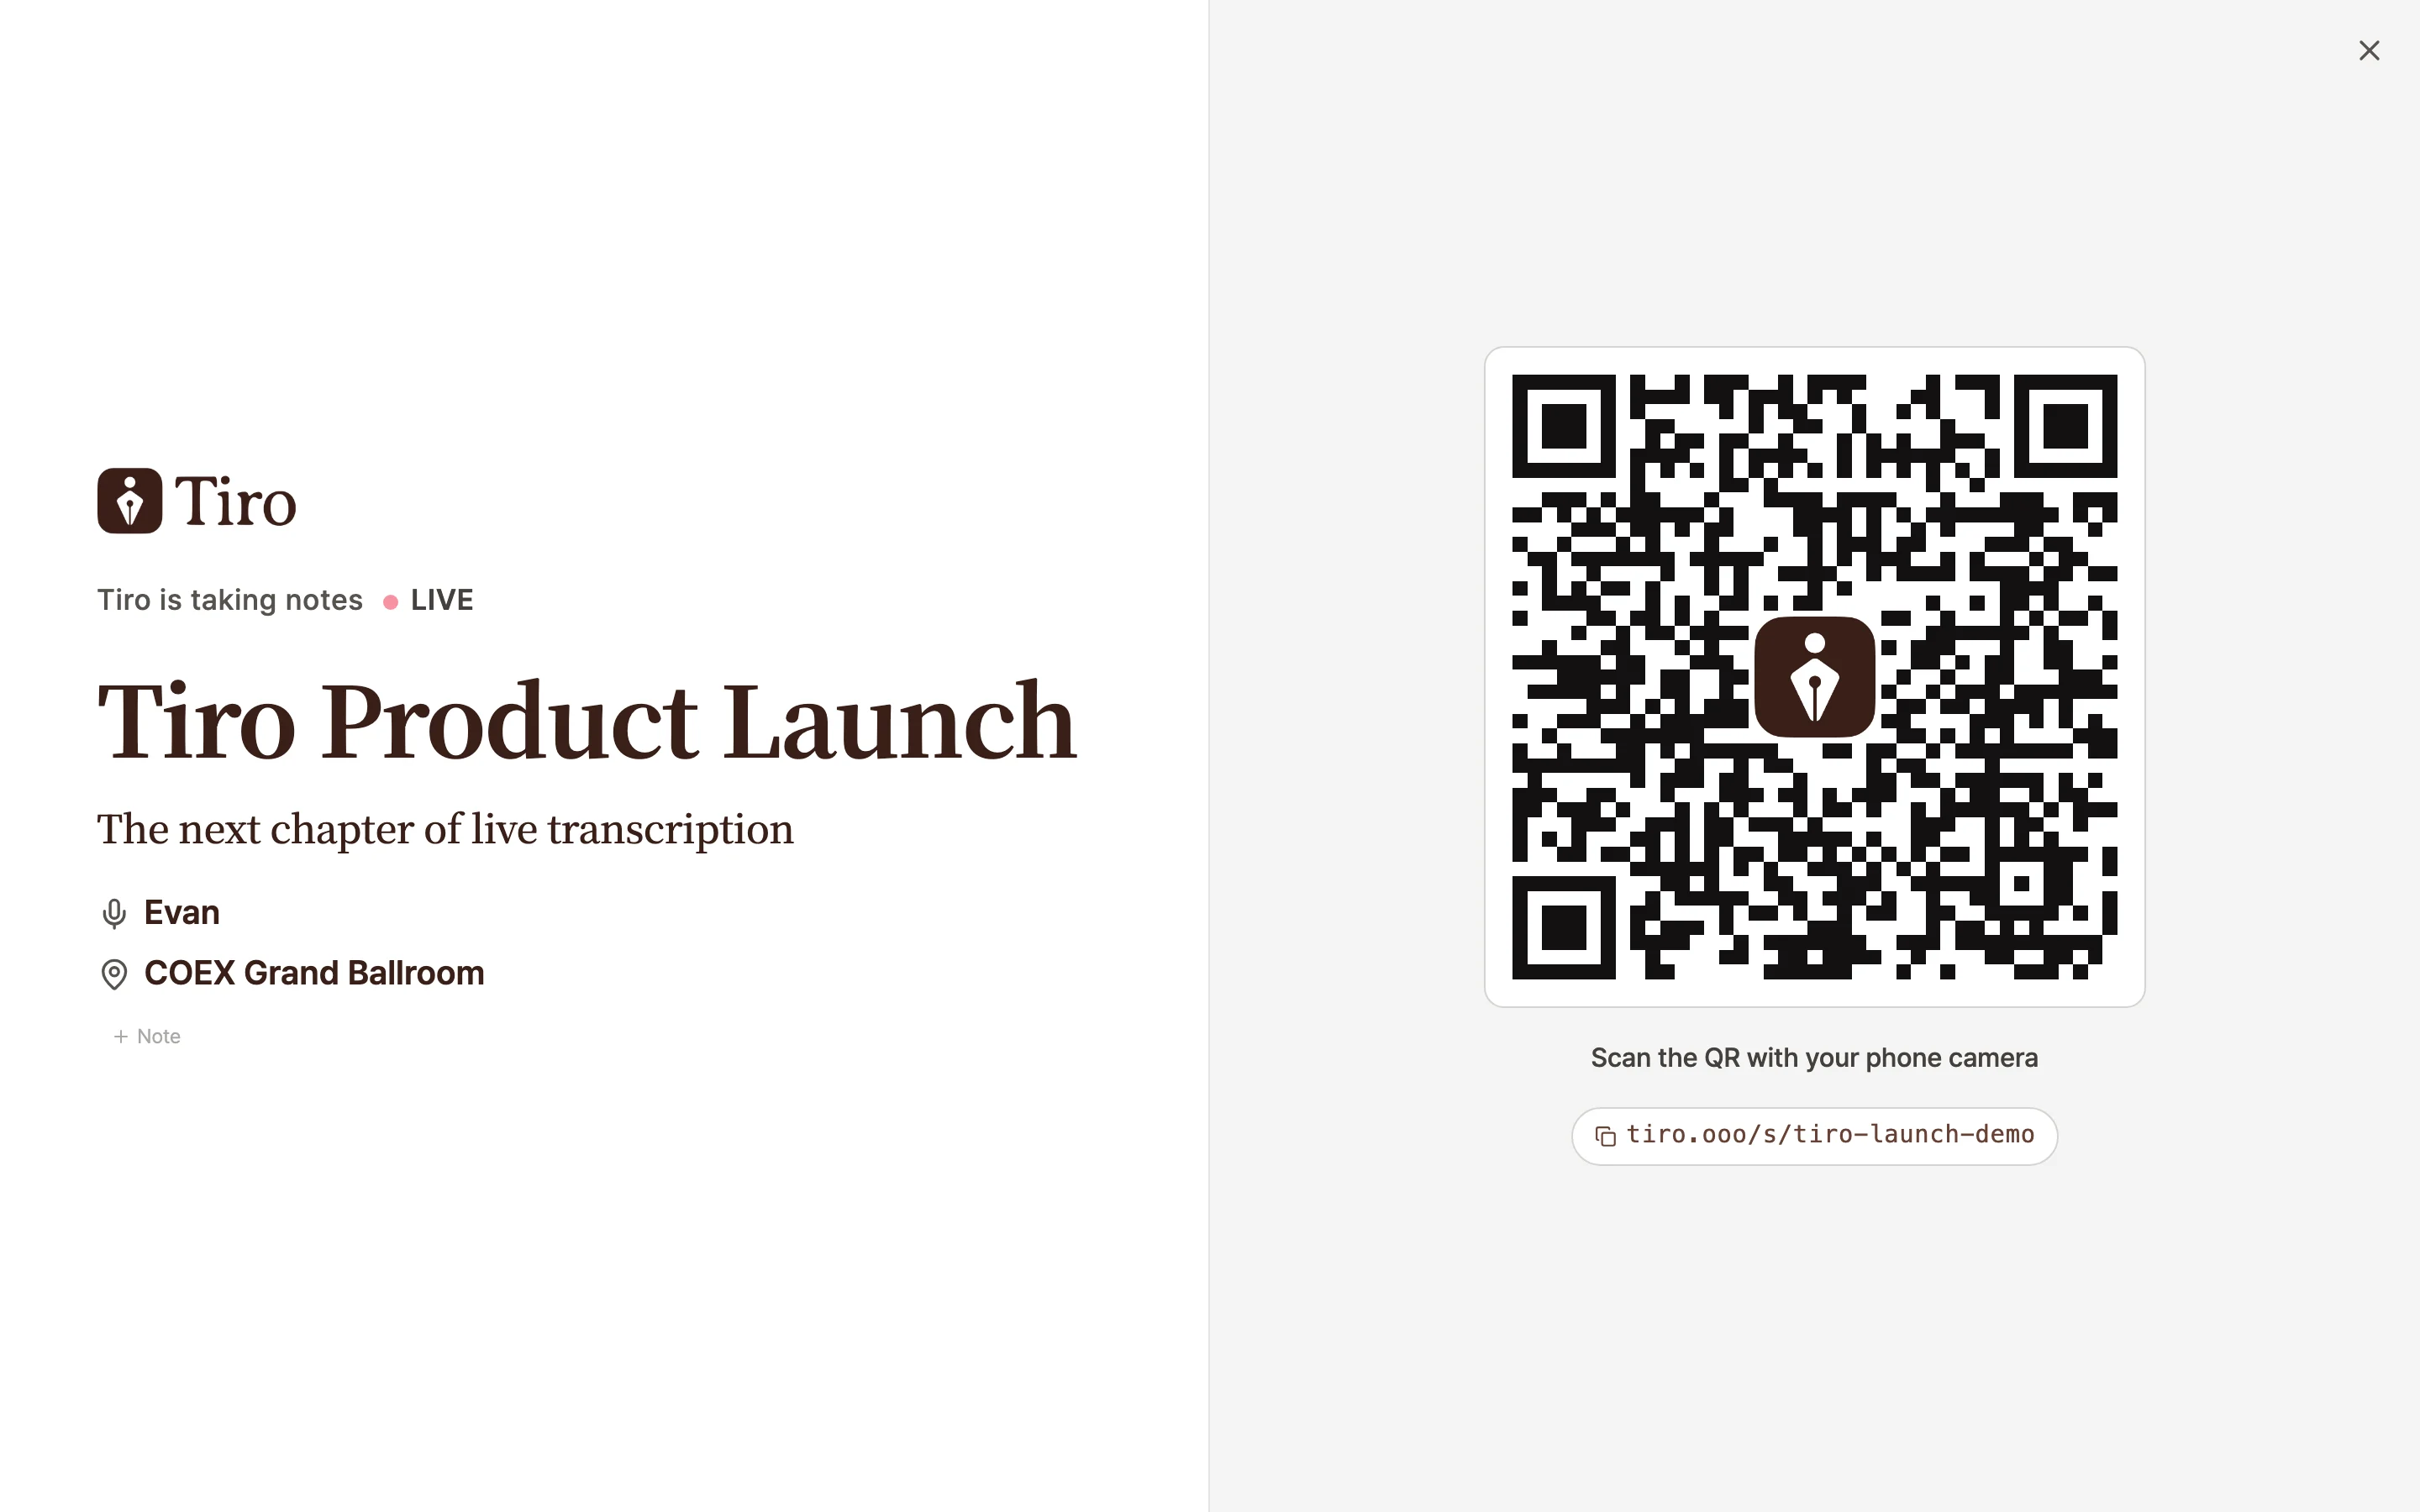
The audience QR screen that opens when you tap [QR]. The left shows the talk title, speaker, and venue the audience will see, and the right shows the scannable QR code and the share address.
Show real-time translated captions
Turn on the [Translation] toggle at the top and pick a translation language, and the source captions and translated captions appear together. The speaker picks the translation language, and the audience reads the translation in that language. Tiro supports 15 languages, including Korean, English, Japanese, and Chinese. If you want the translation shown large on its own without the source, pick the Translation Only layout in [Screen Settings].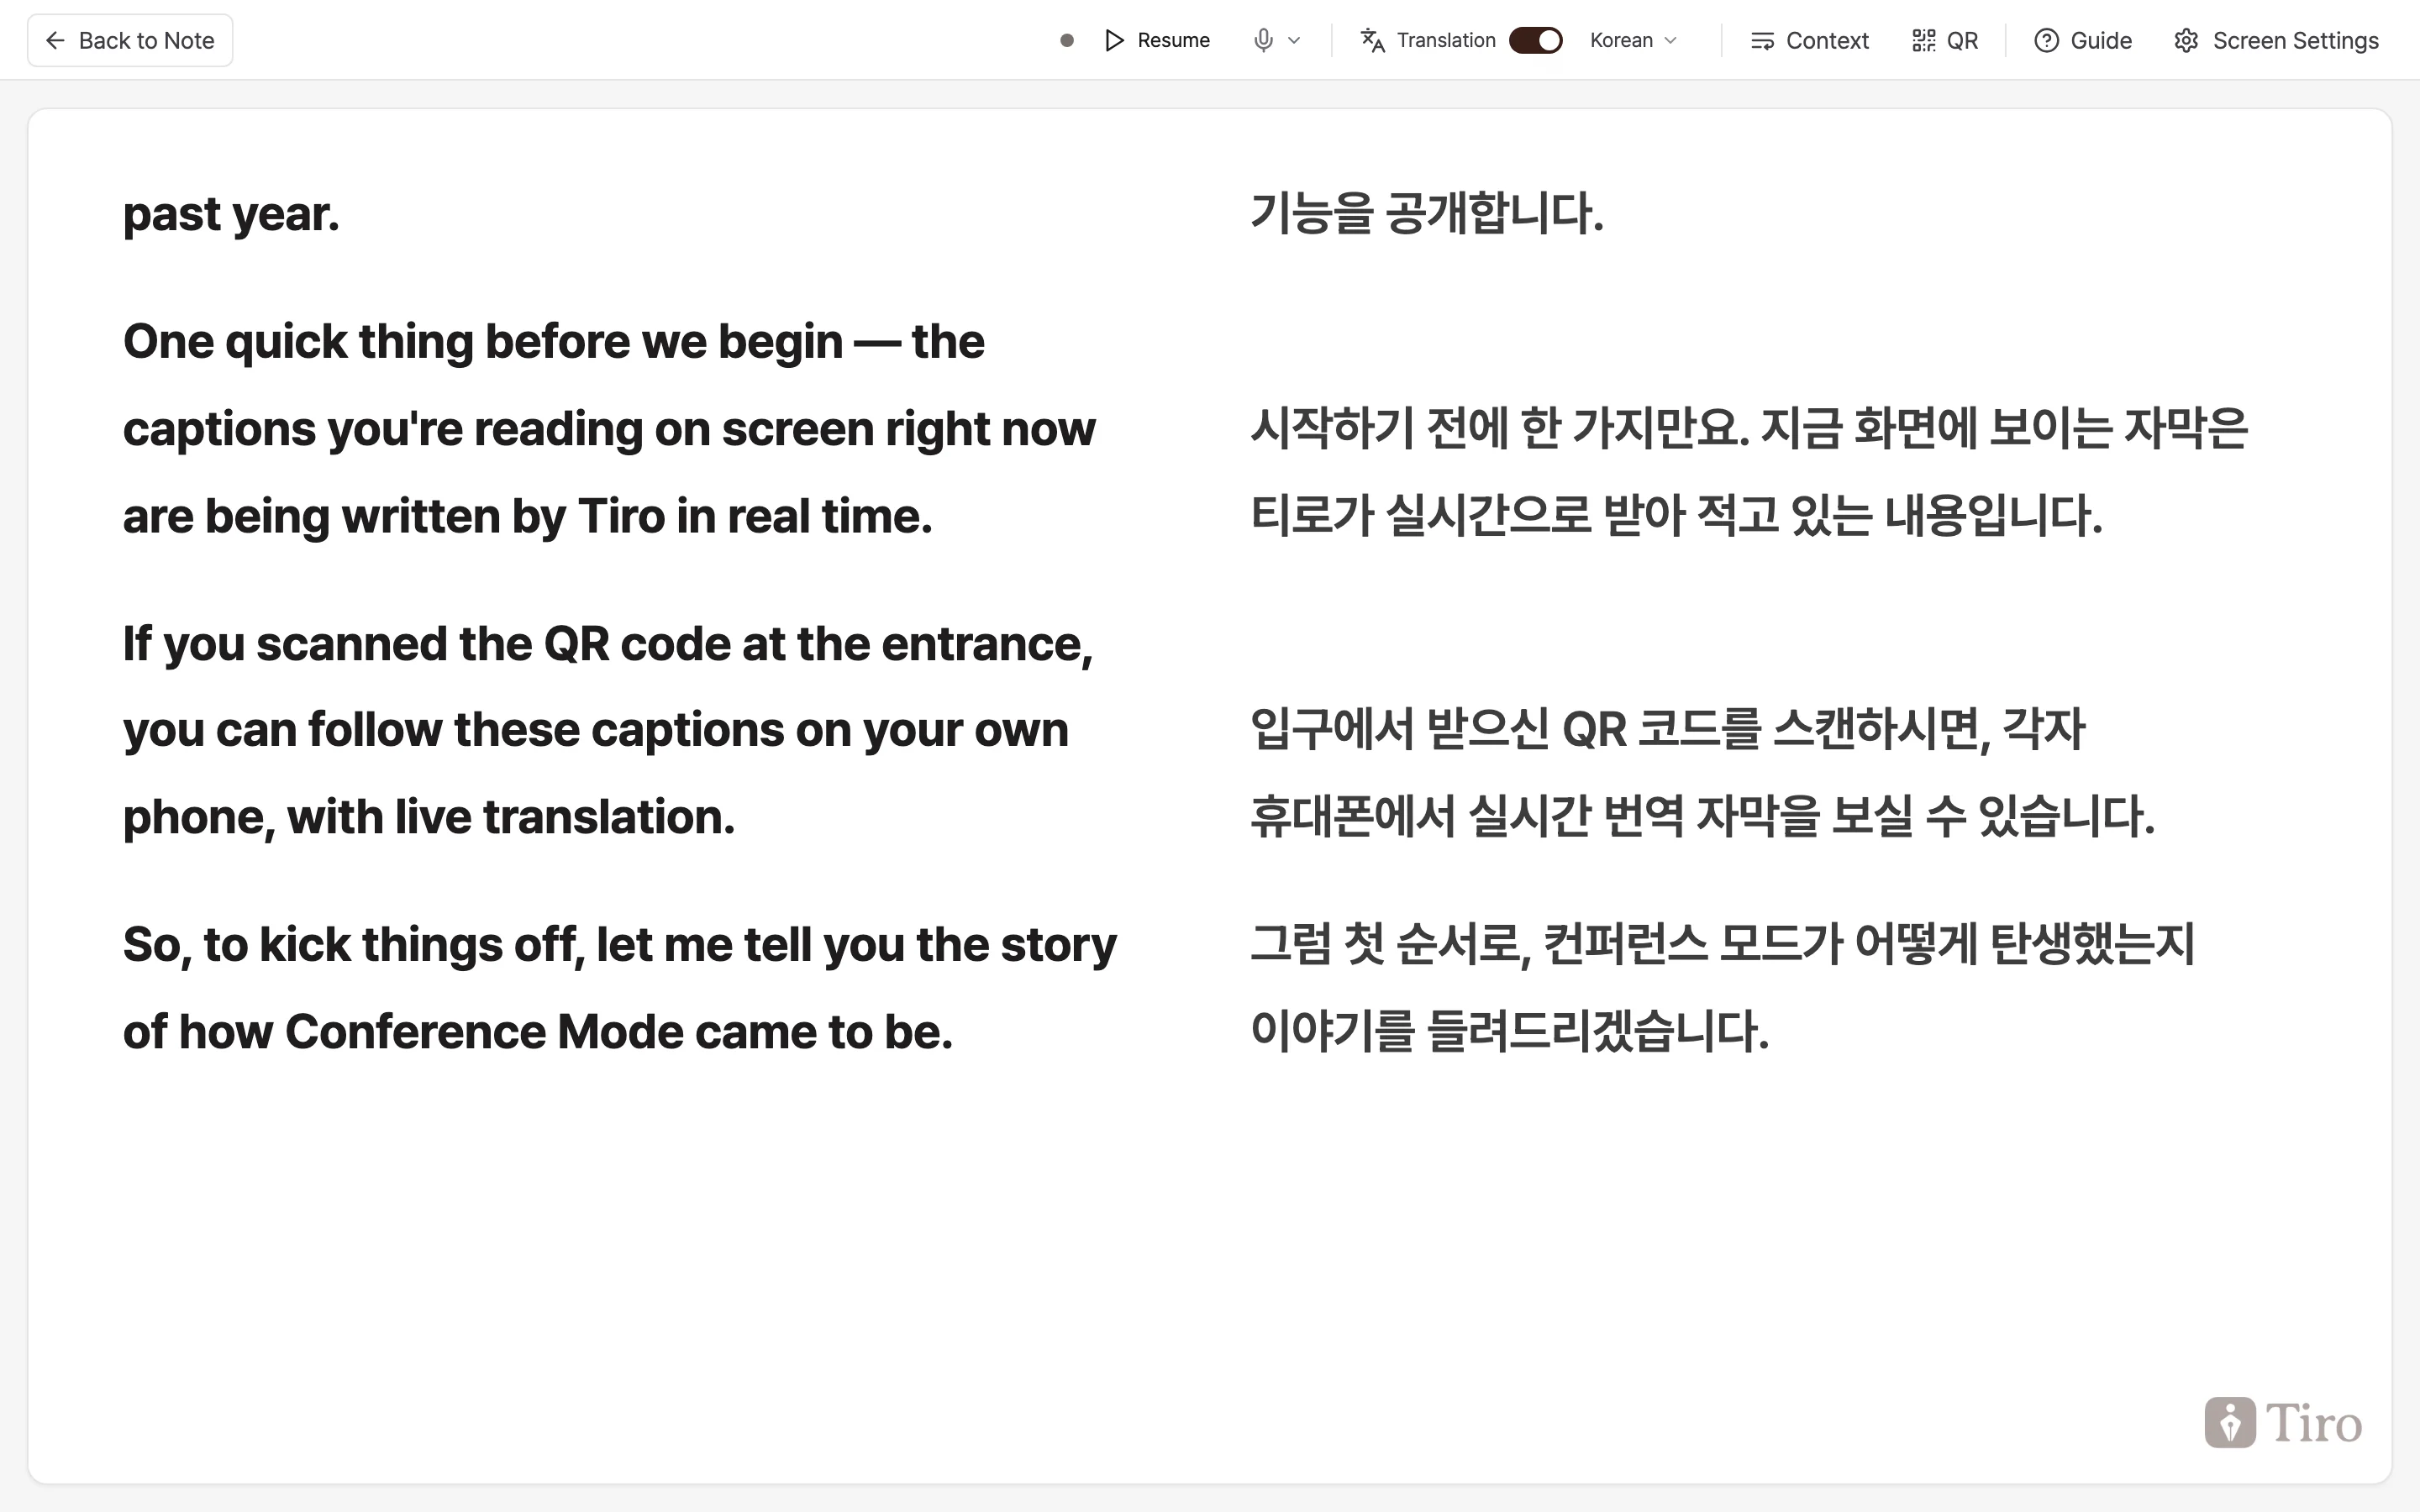
The caption display with the [Translation] toggle on. The left column shows the source text and the right column shows the translated captions, lined up sentence by sentence.
Getting more accuracy out of Tiro
Put the talk topic, proper nouns like people’s and company names, and technical terms into the [Context] button ahead of time, and caption accuracy goes up sharply. Beyond text, you can upload files such as the slide deck (up to 5, each 20MB or less), and you can load and reuse context you wrote earlier. You can change it mid-talk too. The Context page covers this in full.Preparing the event, and what it costs
What you need
There is nothing to bring into the venue.- One laptop: connected to the screen you want captions on. A web browser or the desktop app is enough
- A feed of the room audio: running the main mixer’s line out into the laptop through a USB audio interface gives you the best caption accuracy, well above the built-in mic
- Internet: a wired LAN is safest; on Wi-Fi, aim for at least 10Mbps down and 5Mbps up
What it costs
Whatever plan you already pay for. Conference mode is included on every paid plan, so there is nothing to buy for the event. For a single-day event, one month of the Max plan and its unlimited usage covers rehearsals with room to spare.When the recording ends
When the speaker ends the recording, the screen the audience was watching automatically becomes a regular share page. The audience can reread the full talk transcript from the start at the same link. The speaker’s note keeps the usual one-page document, Note, and transcript.Planning a large event? Our team can handle the setup
A conference for hundreds of people, an international event running in several languages, tracks going at once: that is a lot to prepare. The Conference Mode package exists for exactly that. We hand it to you already set up, with a dedicated event operating account, your event details and language configuration in place, a test link before the day, and a priority support channel through the event week. Multilingual displays, custom branding, large-scale audience capacity, and multi-track operation are all things we can build around your event. Email partners@theplato.io with your event date, running time, languages, and expected headcount, and we’ll come back with a setup and a quote that fits.Frequently asked questions
Do I have to pay extra to use Conference mode?
No. If you’re on a paid plan, you can turn it on with nothing extra to buy. For an all-day event, the Max plan and its unlimited usage gives you the most headroom.Do I need an interpreter or captioning hardware?
Neither. One laptop and a feed of the room audio into it is all it takes. Tiro handles the captions and translation, and the audience reads along on their phones.What about events longer than 5 hours?
A note records up to 5 hours, so you stop between sessions and continue in a new note. The new note reissues the QR link, so share it with the audience again. Planning sessions in advance, like morning and afternoon, makes this easy.Do attendees need to sign up for a Tiro account?
No. Scanning the QR shows them the captions right away without signing in. If you’re concerned about public exposure, set a password on the link.The Conference mode button is disabled.
Check three conditions: that it’s a live recording note (file-upload notes don’t qualify), that the [Listen In] language is set to [Multilingual], and that the recording is in progress (the button doesn’t appear on a finished note).Can I use it on mobile?
The speaker screen (Conference mode) only turns on from the web and the desktop app. The audience views it by scanning the QR on their phones, so there’s no device restriction.Related pages: Live recording · Context · Sharing · Plans