

What is a workspace?
A workspace is where your notes, your folders, and the people you work with all live together. A single Tiro account can belong to several workspaces at once, and you switch between them freely by clicking the workspace name at the top of the left sidebar. A solo workspace and a shared workspace are not conceptually different. With one person, you use a personal plan (Lite, Pro, or Max). With two or more, you use a team or enterprise plan.- Personal folder: A folder only you can see. Any note you create without choosing a folder lands here automatically.
- Team folder: A folder shared automatically with people who have access. See Folders for details.
- Workspace word list and templates: Shared by everyone in the workspace.
Create a new workspace
Click the workspace name at the top of the sidebar, choose [Add new workspace], and enter a name. A new workspace is a completely fresh space, so people and notes from your other workspaces do not carry over. You can create a new workspace on web and desktop.Join an existing workspace
To join an active workspace, an admin of that workspace has to invite you. Accept from the invite email, or accept right inside Tiro if you already use it. The role you’re given is set by whoever invited you, and you can’t change it when you join; for what each role can do, see Workspace roles.Accept an invite by email
The invite arrives at the email address you were invited at. Click the button in the email to open the invitation page.- If you already have a Tiro account: On the invitation page, check the workspace name and click [Join] to become a member right away. To hold off for now, click [Later] and accept later from inside Tiro. The email you were invited at and the email you’re signed in with have to match.
- If you don’t have an account: You’re taken to the sign-up screen. Sign up with the exact email you were invited at, and you join automatically the moment sign-up finishes. Signing up with a different email skips the automatic join.
To accept an invitation, you have to sign in to (or sign up for) Tiro with the exact email address you were invited at. If that email works with Google or Microsoft sign-in, use that method; otherwise, sign up with email to create an account with the same address. If your company set the domain to SSO only, sign in with [Continue with SSO]. Signing in with a different email than the one you were invited at won’t accept the invitation. Contact hello@theplato.io if you need help.
Accept an invite inside Tiro
If you already use Tiro, you can accept invitations right inside the app without going through email. This works on the web and desktop apps.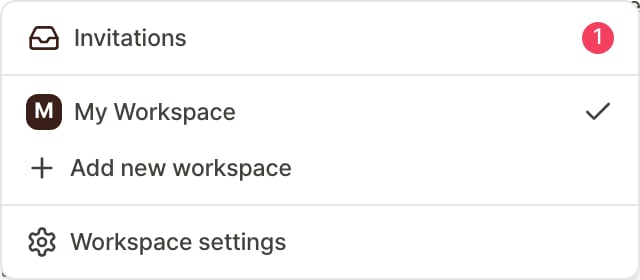
The workspace switcher menu. The [Invitations] row at the top shows the number of invitations you have as a red badge on the right
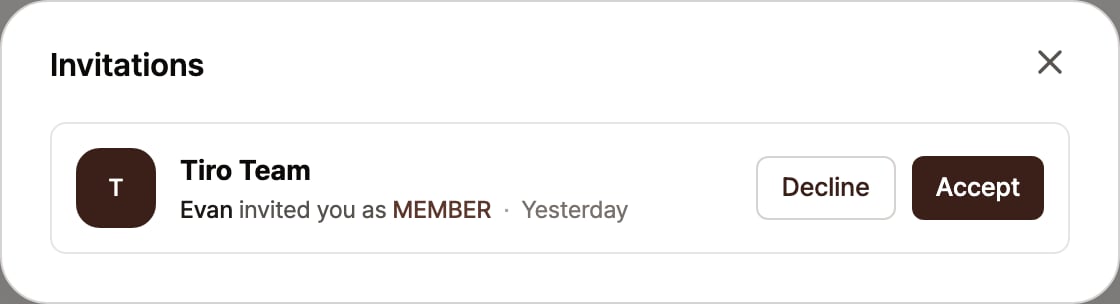
The "Invitations" screen. Each invitation shows the workspace name, who invited you, and the role, with [Accept] and [Decline] buttons on the right of the row
1
Open the workspace switcher
Click the workspace name at the top of the left sidebar to expand the list. When you have invitations, the count appears next to the workspace name.
2
Open your invitations
Select [Invitations] from the list to see the invitations you’ve received. Each one shows the workspace name, who invited you and with which role, and when you were invited.
3
Accept or decline
Click [Accept] on the invitation you want to join, and you join right away. Click [Decline] to not join.
What an admin can do
A workspace admin manages people, billing, and some policy settings. When there are several admins, they all hold equal permissions. A workspace has no separate “owner.”- Invite, remove, and change the roles of people in the workspace
- Start, change, and cancel subscriptions, and manage payment methods
- Set whether notes can be moved out of the workspace
- View team folders they weren’t invited to (the notes inside stay hidden)
Invite someone
In Settings, go to [Members] → [Invite member], set the email and role (Admin or Member), and send the invite. To invite someone into a solo workspace on a personal plan, first switch to a team plan from the [Manage Subscription] menu. See Tiro plans.Remove someone
In the member list, select [⋯] → [Remove member] next to the person you want to remove (admin permission required).- Someone you remove can no longer access the workspace. Notes they were invited to directly stay available under [Shared with me].
- The last remaining admin can’t remove themselves. Assign someone else as admin first.
Move notes between workspaces
You can move a note only when an admin has turned on the move toggle under [Settings] → [Workspace] → General. Once it’s allowed, you can move notes you created from the [⋯] → [Move to another workspace] menu at the top right of a note, and you can select several at once.- A moved note appears in the inbox of your personal folder.
- Usage stays permanently tied to the workspace where the note was first created. Even after you move it, it counts toward that original workspace’s subscription.
- A note that’s still recording can’t be moved. Stop recording first, then move it.
Change the workspace icon
Change the workspace icon from the [Workspace info] section under [Settings] → [Workspace] → General. Only Admins and Unpaid admins can change it, and it works on the web and desktop app. Click the icon area to choose an image. If an icon is already uploaded, a menu opens first; use [Change image] to upload another image or [Remove] to clear the icon.- Supported formats: PNG, JPG, WebP
- Maximum size: 5 MB
- Recommended ratio: Square image
If you joined as a Member or Viewer, workspace info is read-only and you see “Only admins can edit workspace info.”
Leave a workspace
Go to [Settings] → [Members], then select [⋯] → [Leave workspace] next to your own name. Press [Leave] again in the confirmation dialog. Once you’ve left, you can’t access that workspace’s notes and folders, so move anything you need to another workspace first. There’s one condition that prevents you from leaving: you can’t leave if you’re the workspace’s only Admin. Instead, you’ll see “There must be another Admin before you can leave.” Make another person an Admin and try again. An active subscription doesn’t prevent you from leaving. In a workspace you use alone, you’re the only Admin, so you can’t leave through this path. To remove just that space, delete the workspace below. To stop using Tiro entirely, see Delete your account.Delete a workspace
To remove an entire workspace, open [Settings] → [Workspace] → General, expand [Advanced settings], and press [Delete workspace]. In the confirmation dialog, press [Permanently delete] once more. Only Admins and Unpaid admins can delete a workspace, and it works on the web and desktop app. Leaving a workspace and deleting a workspace have different results. Leaving only removes your access while the workspace and notes stay in place. Deleting removes the workspace itself, so every member loses access to its notes and folders.Check before deleting
- Subscription billed on web or desktop: Deleting the workspace also cancels the subscription. Remaining time isn’t refunded, so check the billing cycle before deleting.
- Workspace subscribed through mobile in-app purchase: You can’t delete it. First manage the subscription in the App Store or Google Play. See Manage your subscription.
- Workspace inside an Enterprise Organization: You can’t delete it from this screen. The organization admin manages it from organization settings.
- Your role: Only Admins and Unpaid admins can delete a workspace. Members and Viewers don’t see the delete button.
Frequently asked questions
Can I have several workspaces under one account?
Yes. You can belong to a company workspace and keep a separate personal one. Each workspace has fully independent billing, people, and notes. The one exception: a company account that belongs to an enterprise Organization can’t create a separate workspace outside that Organization.Do all my existing notes get shared when I invite someone?
No. Notes in your personal folder stay invisible to other people. Only notes you’ve placed in a team folder are shared, according to each person’s access. A new person joining never makes your existing notes public.Do I get another free trial if I create a new workspace?
No. The free trial is offered once, in the default workspace created when you sign up. See Free trial for details.I was on a team plan, and now I have two workspaces.
A workspace redesign gave existing team-plan users two spaces. Your default workspace holds the personal notes you made before joining the team, and the workspace shared with your team holds the notes made within the team. No notes were moved or deleted automatically, and access stayed the same. Switch between the two from the top of the sidebar.I have a personal folder (Private) in two places. Is that normal?
Yes. Each workspace has its own personal folder, and they’re independent of each other. If you want to merge them, move the notes over yourself.What happens if I invite someone to a solo workspace I’m already paying for?
If you were paying on the web, you can switch to a team plan right away from the [Manage Subscription] menu, and only the prorated difference is charged from the moment you switch. If you were paying through a mobile in-app purchase, you can’t switch instantly: start a team plan on desktop and cancel the existing in-app purchase in the store. See Manage your subscription for the full steps.Tiro says I can’t leave the workspace
This appears when you’re the workspace’s only Admin. Make another person an Admin, and you can leave right away. Leaving, deleting a workspace, and deleting your account have different restrictions: leaving is blocked only when you’re the sole Admin, while workspace deletion is blocked for Organization workspaces or while a mobile in-app subscription is active.Should I leave the workspace, delete it, or delete my account?
Leave when only you need to exit a shared workspace. Delete the workspace when you want to remove the entire space and its notes. Delete your account when you want to stop using Tiro entirely. You can’t leave a workspace you use alone because you’re its only Admin, so delete the workspace or your account instead.Can I delete my last remaining workspace?
Yes. You can delete the last workspace you have. After deletion, you’ll see the “You don’t have a workspace yet” screen and can create a new workspace right away with [Create workspace]. If you have pending invitations, you can check them from the same screen.Related pages: Tiro plans · Folders · Manage your subscription