

Three ways to share
Share a note three ways: by link, by invite, or by export. Pick the one that fits the moment.- Share by link: use the [Copy Link] button to create a share link and send it to anyone. Whoever receives it opens the note right away, without signing in.
- Invite people to collaborate: give specific people a viewer, editor, or owner role and work on the note together.
- Export to a file or collaboration tool: export a note as PDF, Word, or email, or send it to Slack, Notion, Confluence, or HubSpot. For the details, see Integrations.
To send a note automatically every time a recording ends, set up share automation.
Start sharing a note
Click the [Share] button at the top right of the note screen to open the share menu. Link sharing and invites work while a recording is in progress, and file exports and integrations become available once the recording ends. You can also share a link straight from the [Share] button while a note is open as a preview in the list, without opening the note in full.Share with a link
Click the [Copy Link] button to copy a share link you can send to anyone. Whoever receives the link opens the note right away, without a Tiro account or signing in. Open the share popup on a note, and the “Share note” screen appears. The “Share link” row at the bottom of the “Access” section shows the current scope on the right, with a green dot when the link is on and a lock icon when it’s password-protected. Click the row to open the “Share link settings” screen.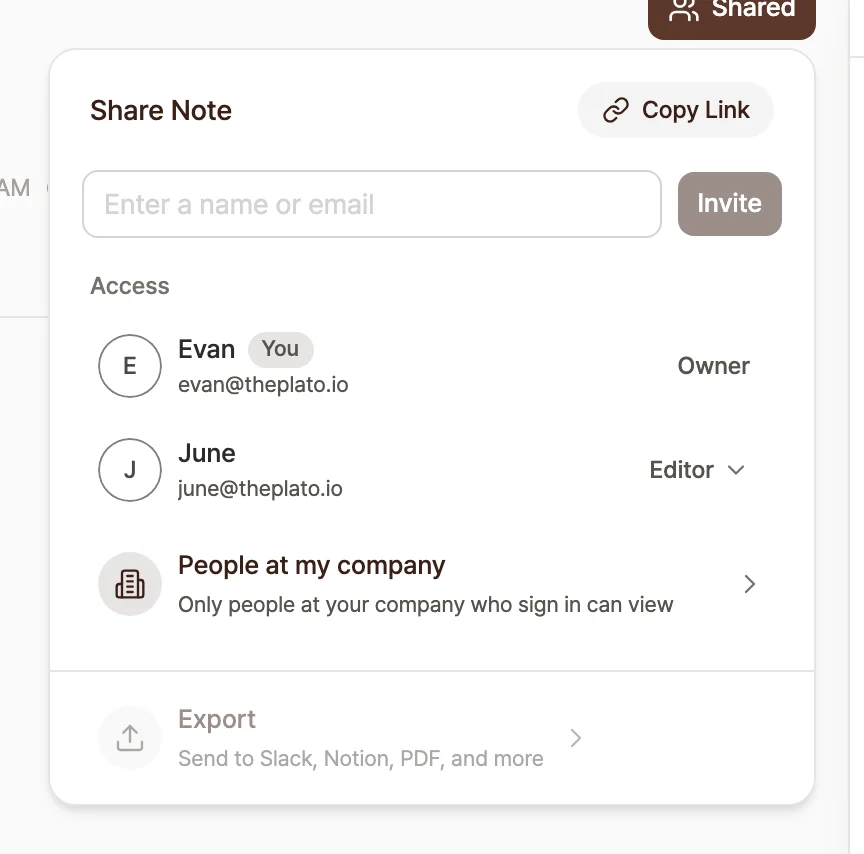
The "Share note" screen. The bottom row of the "Access" section shows the current share scope.
Choose a share scope
A share link’s scope is one of three levels. Open the [Who can view] dropdown on the “Share link settings” screen and pick one.- [Anyone with the link]: anyone who receives the link can view it, read-only.
- [People at my company]: only people signed in with a company account can view it. By default, Tiro treats the account domain of whoever shared the note as the company domain, and public mail domains like Gmail never become a company domain automatically. When allowed company domains are set, this option shows the actual domain name, for example [People at theplato.io] for a single domain like theplato.io, or [People at theplato.io +2 more] when there are several.
- [Only invited people]: only people invited directly to the note can open the link. Invitees sign in with their own account to view the note; for anyone else the link doesn’t open.
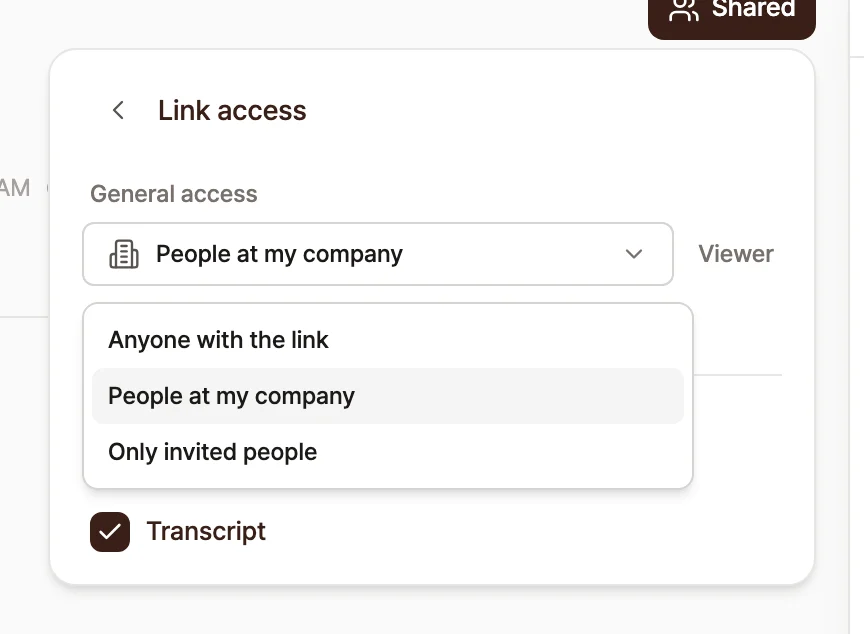
The [Who can view] dropdown on the "Share link settings" screen.
Protect with a password
Add a password to a link, and only people who know the password can view the note. The password is generated automatically as a strong value, and the [Copy Link & Password] button sends the link and password together. In the mobile app, the [Link] section of the share menu handles sending, copying, and settings, and the [Generate Password] switch turns protection on.Show a QR code
You can display a share link as a QR code so people on site scan it right away. At the top right of the “Share note” screen, press the QR code icon next to the [Copy Link] button to open the “QR code” screen. It’s available in the web, desktop, and mobile apps.- Show the screen to attendees at a seminar or meeting, and each person opens the note on their own device.
- The [Save image] button downloads the QR code as a PNG image you can drop into your materials.
- The [Copy Link] button copies the same link from the QR screen too.
Revoke a link
To kill a share link for good, click the [Revoke link] button at the bottom of the “Share link settings” screen and confirm with [Revoke link] in the dialog. The link is disabled immediately for everyone, and its password and sharing-scope settings go with it. Sharing again creates a share link with a new address. To keep the link address but stop people from viewing, change [Who can view] to [Only invited people] instead. Only people invited directly to the note can open it.Change the default scope for new links
You can set the default scope for the share links you create from now on. Under [Settings] → General, in the “Sharing & privacy” section, pick the scope you want for the [Default link access] option, and every share link you create after that uses it by default. Even if you set a default wider than the workspace cap, sharing still limits it to the cap. For the details, see Link sharing security.Invite people to work together
If you want to give specific people a role instead of sharing a link, invite them from the [Permission Settings] menu. Search by name or email, and your registered participants show up right away. For anyone not registered, type their full email to add them. What an invited person can do depends on their role.
On a note you received as a viewer, the top-right button shows [Export], and only PDF and Word export is available. Renaming speakers and organizing folders aren’t available to viewers either.
Choose what to show
When you share, pick and combine what recipients see. Choose only what you want from the summary, transcript, conversation log, and any documents you generated. Recipients see only what you selected at the time of sharing. Leave the transcript out, for example, and they cannot see it. The same selection applies to file and collaboration-tool exports, so you can include only the summary, transcript, or documents you want there too.Good to know when sharing
Workspace policy can restrict link sharing. If you see “Link sharing isn’t allowed for this team,” contact your workspace admin. For how policy restricts the share scope, see Link sharing security. To share several notes at once by folder, use a team folder under Folders.Frequently asked questions
Does someone who receives a link have to sign up for Tiro?
No. Whoever receives a link opens the note right away without signing in. For a password-protected link, they just enter the password.Can I set the password myself?
The password is generated automatically as a strong value. You can view and copy it in the link settings, and the [Copy Link & Password] button makes it easy to send both together.Can I share while recording?
Yes. Link sharing and invites work while recording. Recipients see what gets captured in real time. PDF, Word, and email exports and collaboration-tool sending turn on once the recording ends. For how to export, see Integrations.I want to stop sharing.
To remove the link entirely, click [Revoke link] at the bottom of the “Share link settings” screen. The link is then disabled for everyone. To keep the address but restrict viewing, change [Who can view] to [Only invited people], and only invitees can open it. To drop someone you invited, remove them in the permission settings. For how an admin revokes share links across the workspace, see Link sharing security.Related pages: Folders · Link sharing security · Integrations · Share automation